搭建个人博客(GithubPages + VuePress)
搭建个人博客(GithubPages + VuePress)
参考链接
https://vuepress.vuejs.org/zh/guide/getting-started.html
准备工具:
Chocolatey(Windows包管理工具)
安装依赖环境
安装Node.js
choco install nodejs安装pnpm
choco install pnpm创建项目
创建vuepress-starter文件夹
初始化项目
git init
pnpm init
安装VuePress
# 安装 vuepress 和 vue
pnpm add -D vuepress@next vue
# 安装打包工具和主题
pnpm add -D @vuepress/bundler-vite@next @vuepress/theme-default@next
报错了
$ pnpm add -D vuepress@next vue
 WARN  GET https://registry.npmjs.org/vue error (ECONNRESET). Will retry in 10 seconds. 2 retries left.
查看并更改pnpm源
# 查看当前源
pnpm config get registry

# 修改为淘宝源
pnpm config set registry https://registry.npmmirror.com/

# 还原到默认源
pnpm config set registry https://registry.npmjs.org/

参考链接:
https://juejin.cn/post/7337953934773911561#heading-3
创建目录及文件
mkdir docs
mkdir docs/.vuepress
touch docs/.vuepress/config.js
config.js
import { viteBundler } from '@vuepress/bundler-vite'
import { defaultTheme } from '@vuepress/theme-default'
import { defineUserConfig } from 'vuepress'

export default defineUserConfig({
  bundler: viteBundler(),
  theme: defaultTheme(),
})
创建第一篇文档
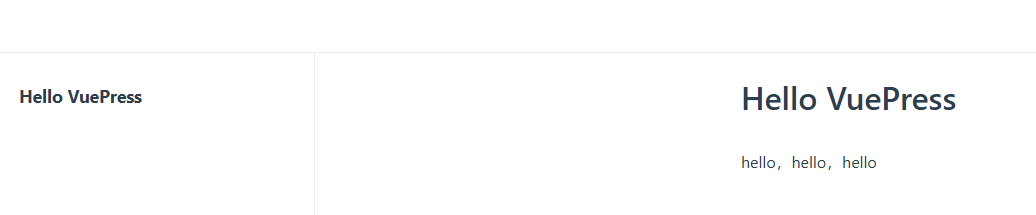
echo '# Hello VuePress' > docs/README.md目录结构
├─ docs
│  ├─ .vuepress
│  │  └─ config.js
│  └─ README.md
└─ package.jsondocs: 放置Markdown文件
.vuepress: 放置配置文件、临时文件、缓存文件和构建输出文件(可添加到.gitignore)
gitigonre文件示例:
# VuePress 默认临时文件目录
.vuepress/.temp
# VuePress 默认缓存目录
.vuepress/.cache
# VuePress 默认构建生成的静态文件目录
.vuepress/dist
使用VuePress
修改package.json中的”scripts“
"scripts": {
    "test": "echo \"Error: no test specified\" && exit 1",
	"docs:dev": "vuepress dev docs",
    "docs:build": "vuepress build docs"
  },
启动开发服务器
#启动一个热重载的开发服务器,修改你的 Markdown 文件时,浏览器中的内容也会自动更新
pnpm docs:dev
访问 http://localhost:8080
构建网站
#在`docs/.vuepress/dist`构建生成的静态文件
pnpm docs:build
丰富网站内容
增加网站标题和描述
docs/.vuepress/config.js文件
export default defineUserConfig({
bundler: viteBundler(),
theme: defaultTheme(),
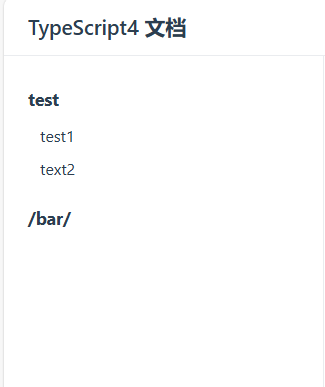
title: 'TypeScript4 文档',
description: 'TypeScript4 最新官方文档翻译',
})配置导航栏
theme: defaultTheme({
    navbar: [
      {
        text: 'github',
        link: '',
      },
    ]
  }),
前端

教程文档
https://ecosystem.vuejs.press/zh/themes/default/config.html#navbar
侧边栏
教程文档
https://ecosystem.vuejs.press/zh/themes/default/config.html#sidebar
theme: defaultTheme({
    //导航栏

    //侧边栏
    sidebar: [
      {
        text: 'test',
        prefix: '/foo/',
        link: '/foo/',
        collapsible: false,
        children: [
          {
            text: 'test1',
            link: '',
          },
          {
            text: 'text2',
            link: '',
          },
        ],
      },
      '/bar/README.md',
    ],
  }),
前端
更换主题
Plume官方文档
https://theme-plume.vuejs.press/guide/quick-start/#完成
安装相关依赖(?此时自己也不知道操作的正确性
pnpm add -D vuepress-theme-plume @vuepress/bundler-vite@nextconfig.js文件修改
import { plumeTheme } from 'vuepress-theme-plume'
export default defineUserConfig({
  bundler: viteBundler(),
  theme: plumeTheme({
      ...
前端界面

安装hope主题并生成一个Demo,以学习语法
官方文档:https://theme-hope.vuejs.press/zh/
https://theme-hope.vuejs.press/zh/guide/intro/install.html#%E5%AE%89%E8%A3%85
新建VuePress(Hope)项目
新建一个hope主题的VuePress项目(在新建项目时,不知道该用什么键来更改选择,所以选择使用键盘打出自己想要的选项)
WIN11@DESKTOP-42B4J2H MINGW64 /g/blog-vuepress
$ pnpm create vuepress-theme-hope hope-demo
? Select a language to display / 选择显示语言 简体中文
? 选择包管理器 (Use arrow keys)
? 选择包管理器 pnpm
? 你想要使用哪个打包器? (Use arrow keys)
? 你想要使用哪个打包器? vite
生成 package.json...
? 设置应用名称 (vuepress-theme-hope-template) hope-demo
? 设置应用名称 hope-demo
? 设置应用描述 (A project of vuepress-theme-hope) hope-demo
? 设置应用描述 hope-demo
? 设置应用版本号 (2.0.0)
? 设置应用版本号 2.0.0
? 设置协议 (MIT)
? 设置协议 MIT
生成 tsconfig.json...
? 你想要创建什么类型的项目? docs
? 项目需要用到多语言么? (y/N) n
? 项目需要用到多语言么? no
生成模板...
? 是否初始化 Git 仓库? (Y/n) y
? 是否初始化 Git 仓库? yes
? 是否需要一个自动部署文档到 GitHub Pages 的工作流? (Y/n) y
? 是否需要一个自动部署文档到 GitHub Pages 的工作流? yes
...
模板已成功生成!
? 是否想要现在启动 Demo 查看? (Y/n) y
? 是否想要现在启动 Demo 查看? yes
启动开发服务器...
启动成功后,请在浏览器输入给出的开发服务器地址(默认为 'localhost:8080')
使用tree-node-cli生成文件结构树
#安装tree-node-cli,其依赖于node环境
#参考链接
#https://juejin.cn/post/7046287977000992781
#https://juejin.cn/post/6844903861254094862#heading-3

#设置全局 bin 目录
pnpm config set global-bin-dir "C:\your\custom\path"
#更新环境变量

#全局
pnpm install -g tree-node-cli
使用tree-node-cli生成文件结构树
#忽略“node_modules等文件”,将生成内容输入到tree.md
tree -I ".git|node_modules|.cache|.temp" -a > tree.md
文件结构树
hope-demo
├── package.json
├── pnpm-lock.yaml
├── src    #Markdown文件存放处
│   ├── .vuepress
│   │   ├── config.ts
│   │   ├── navbar.ts   #导航栏
│   │   ├── public
│   │   │   ├── assets
│   │   │   │   ├── icon
│   │   │   │   │   ├── apple-icon-152.png
│   │   │   │   └── image
│   │   │   │       ├── advanced.svg
│   │   │   ├── favicon.ico
│   │   │   ├── logo.png
│   │   │   └── logo.svg
│   │   ├── sidebar.ts    #侧边栏
│   │   ├── styles
│   │   │   ├── config.scss
│   │   │   ├── index.scss
│   │   │   └── palette.scss
│   │   └── theme.ts    #主题设置
│   ├── README.md    #项目主页
│   ├── demo
│   │   ├── README.md
│   │   ├── disable.md
│   │   ├── encrypt.md
│   │   ├── layout.md
│   │   ├── markdown.md
│   │   └── page.md
│   ├── guide
│   │   ├── README.md
│   │   ├── bar
│   │   │   ├── README.md
│   │   │   └── baz.md
│   │   └── foo
│   │       ├── README.md
│   │       └── ray.md
│   └── portfolio.md
├── tree.md
└── tsconfig.json
目录自动生成
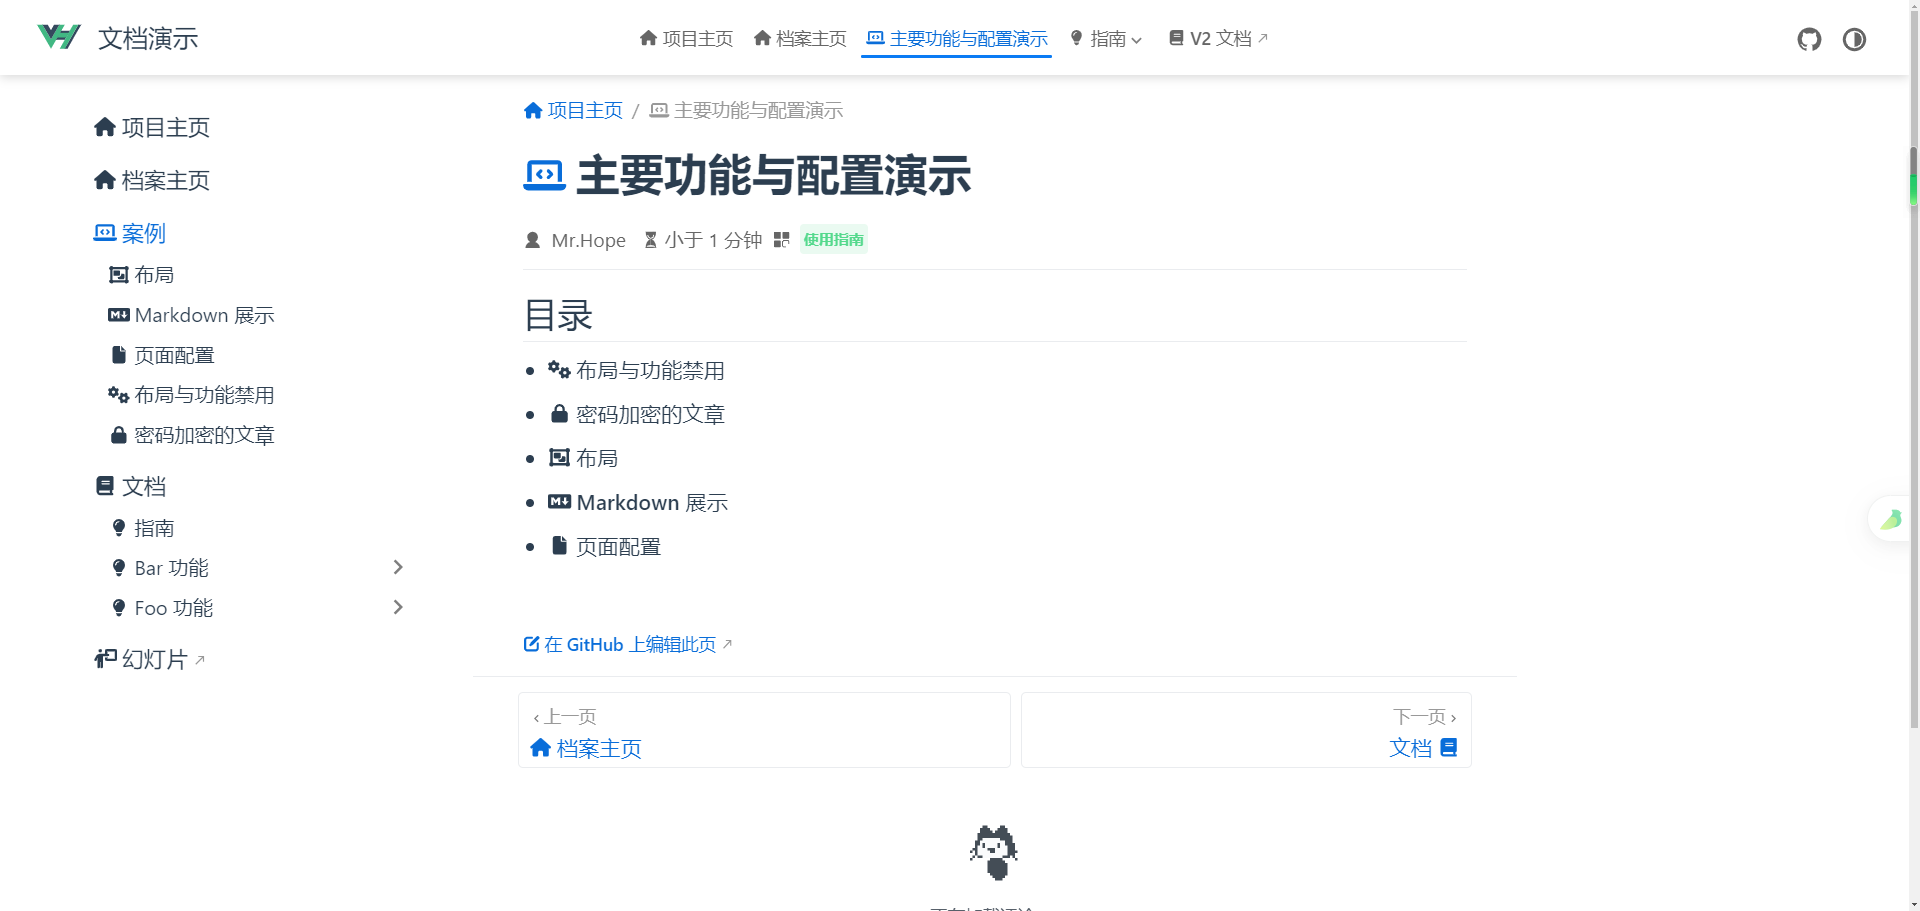
/src/demo/README.md 文件
---
title: 主要功能与配置演示
index: false
icon: laptop-code
category:
  - 使用指南
---

<Catalog />
目录的自动生成:
https://theme-hope.vuejs.press/zh/config/plugins/others.html
示例: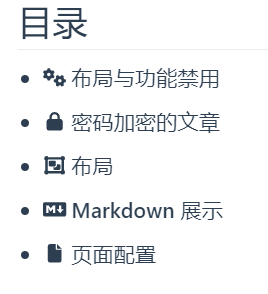
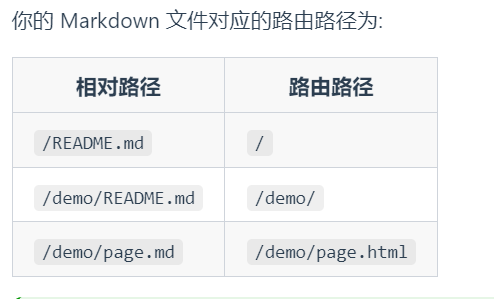
Markdown文件与路由路径的对应关系
https://theme-hope.vuejs.press/zh/get-started/content.html#页面的生成
初始化个人博客项目
$ pnpm create vuepress-theme-hope blog
? Select a language to display / 选择显示语言 (Use arrow keys)
? Select a language to display / 选择显示语言 简体中文
? 选择包管理器 (Use arrow keys)
? 选择包管理器 pnpm
? 你想要使用哪个打包器? (Use arrow keys)
? 你想要使用哪个打包器? vite
生成 package.json...
? 设置应用名称 (vuepress-theme-hope-template) blog
? 设置应用名称 blog
? 设置应用描述 (A project of vuepress-theme-hope) blog
? 设置应用描述 blog
? 设置应用版本号 (2.0.0)
? 设置应用版本号 2.0.0
? 设置协议 (MIT)
? 设置协议 MIT
生成 tsconfig.json...
? 你想要创建什么类型的项目? (Use arrow keys)
? 你想要创建什么类型的项目? blog
? 项目需要用到多语言么? (y/N) n
? 项目需要用到多语言么? no
生成模板...
? 是否初始化 Git 仓库? (Y/n) n
? 是否初始化 Git 仓库? no
...
Done in 36.2s
模板已成功生成!
? 是否想要现在启动 Demo 查看? (Y/n) n
? 是否想要现在启动 Demo 查看? no
提示: 请使用 "pnpm run docs:dev" 命令启动开发服务器
文章,Markdown语法
换行:空两格空格博客首页
/src/README.md
默认的博客首页差不多呈以下界面

由于自己想让博客首页直接呈现博客目录、博客侧边栏,例如以下界面
所以将home: true给注释了(前面加#)
参考:
theme-hope真实项目
https://github.com/OpenWebGAL/WebGAL_Doc
随后,将不需要的内容删除
侧边栏
根据生成的侧边栏文件,照葫芦画瓢,修改成自定义内容
图标可以参考https://fontawesome.com/search中的图标名称
Hope官方文档
导航栏
草稿
貌似没有草稿功能的直接实现,但是可以通过pagePatterns实现
参考
https://zhaohaodang.com/posts/vuepress如何实现草稿功能.html
https://theme-hope.vuejs.press/zh/guide/markdown/content/include.html#高级用法
https://vuejs.press/zh/reference/config.html#debug
src\.vuepress\config.ts 文件
//忽略以'_'开头的md文件
pagePatterns: ["**/*.md", "!**/_*.md", "!.vuepress", "!node_modules"],
如果不想推送到Github远程仓库,可以在 .gitignore 文件中加上
_*.md目录
在使用自动生成目录时,vuepress貌似是根据 文件夹中的README.md(文件夹命名) / markdown文件(其他文件命名) 中 YTAML Frontmatter 的 title 或者 一级标题(使用#标记的内容)来生成的,而不是根据markdown文件名或文件夹名
本地调试
pnpm run docs:devTODO
博客还有很多不完善的地方,例如 搜索引擎、浏览量统计、评论等功能
Github Pages 布署
参考链接
https://theme-reco.vuejs.press/blogs/deploy.html#手动部署https://juejin.cn/post/7189073364365869093#heading-21
将项目部署到Github Pages中的 username.github.io 仓库中(之前已经在Github创建完毕,仓库为 public 公开的)
可以通过Shell脚本来执行以下操作
在博客根目录创建一个deploy.sh文件
先将 /blog(博客网站的根目录) 全部的修改文件提交到本地仓库
git add .
git commit -m "MESSAGE"
随后,到根目录运行deploy.sh文件(Windows,Git Bash)
bash deploy.shdeploy.sh文件示例:
# 确保脚本抛出遇到的错误
set -e

# 生成静态文件
pnpm run docs:build

# 将博客的本地仓库主分支(.md文件)推送到 <USERNAME>.github.io 远程仓库的主分支
# 注意添加.gitignore文件,可以将src/.vuepress/.cache/ src/.vuepress/.temp/ src/.vuepress/dist/ node_modules 等文件忽略,“src” 可能需要更改,不同的项目可能不同(例如 docs)
# git push git@github.com:<USERNAME>/<USERNAME>.github.io.git master

# 进入生成的文件夹,注意 src 可能需要更改
cd src/.vuepress/dist

# 如果是发布到自定义域名
# echo 'www.example.com' > CNAME

git init
git add -A
git commit -m 'deploy'

# 如果发布到 https://<USERNAME>.github.io
# 将生成的静态网页文件推送到 <USERNAME>.github.io 仓库的分支 gh-pages ,主分支当作 .md 文件存放处,gh-pages 分支当作生成的静态网页文件存放处,并且将Github Pages的 Source 改成 gh-pages 分支,远程仓库不需要提前生成 gh-pages 分支,推送时会自动创建
# git push -f git@github.com:<USERNAME>/<USERNAME>.github.io.git master:gh-pages

# 删除生成的静态网页文件
# rm -rf *

#返回上一次访问的文件夹
cd -
接着,在Github的 username.github.io 仓库中更改设置

Github Pages
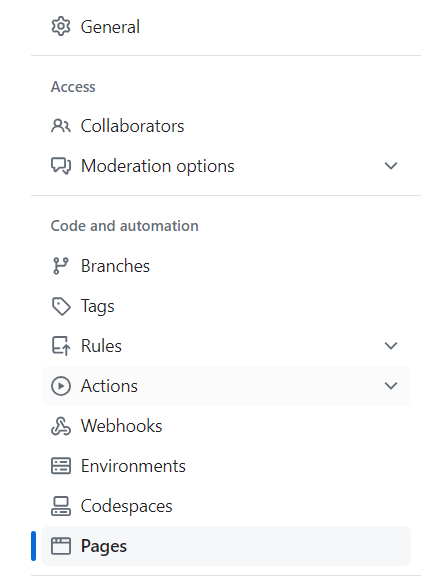
将 Branch 改成 gh-pages
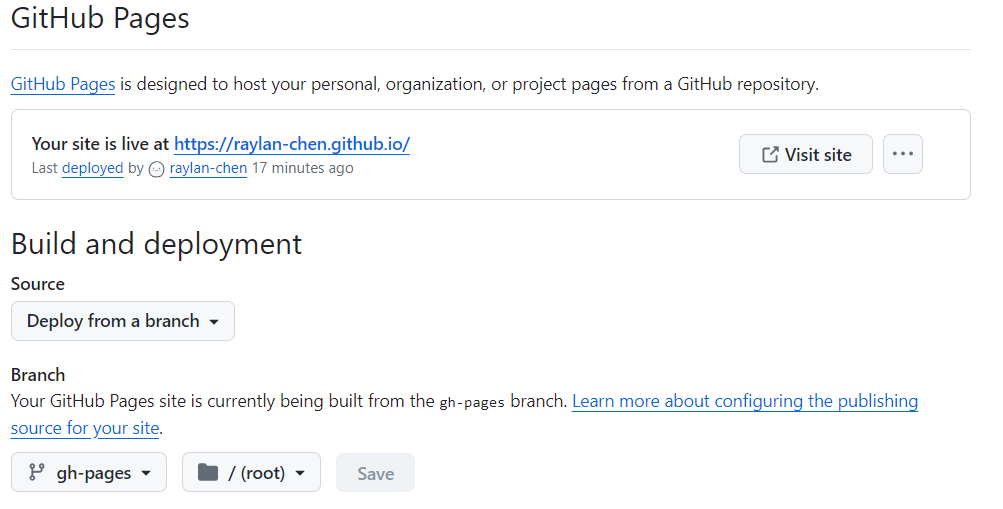
接下来,可以访问 https://username.github.io/ 测试下

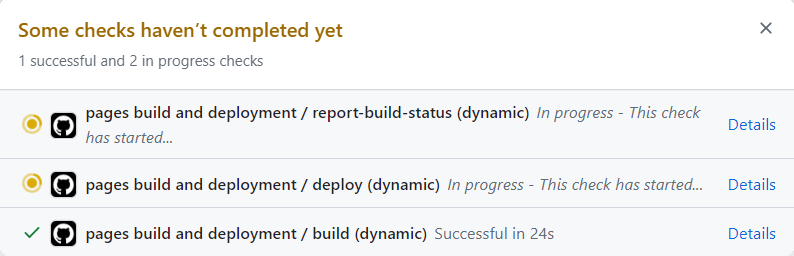
貌似可以查看Github Pages构建和布署进程